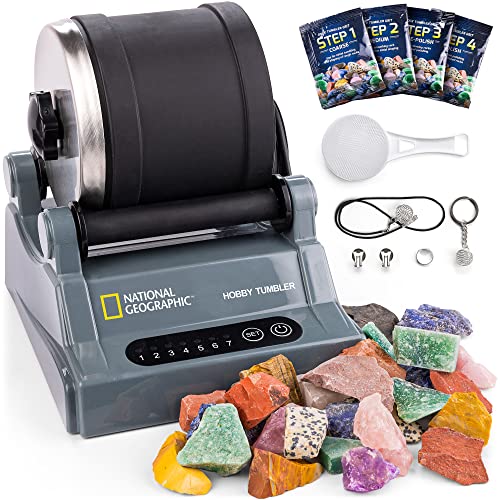
Check the core consumables by name
RockTumbler.com’s supply guide distinguishes grinding abrasives from polishing compounds and explains the progression from shaping toward a finer surface. Use that distinction when reading a bundle description. “Four packets” is less informative than a clear identification of what each packet contains and which stage it serves.
Write down the supplied rough, abrasive stages, final polish, and any recommended media. Check quantities against the exact machine’s instructions. A packet count does not establish how many properly loaded batches the kit supports, especially if the process needs an additional shaping cycle.
Build a useful purchase checklist
Mark every line included, already owned, needed now, or optional. The point is to expose omissions without turning a starter project into an unnecessary shopping list.
- Machine and barrel: correct model, complete lid assembly, power arrangement, and operating manual.
- Rough: identified material with sizes appropriate to the documented loading procedure.
- Grit and polish: named products, quantities, and a procedure for the exact machine and material.
- Media: include it when the recipe calls for it; confirm the type and whether preparation is required.
- Handling: dedicated containers, suitable measuring equipment, labels, and a cleanup plan.
- Support: manufacturer contact, compatible wear-part identification, and care instructions.
Keep craft extras in their own column
Jewelry findings, display boxes, and identification cards may be enjoyable, but they serve a different purpose from a barrel seal or an abrasive refill. Evaluate them after the operating essentials. If you would not purchase a craft extra separately, do not let a high accessory count dominate the machine decision.
The same logic applies to spare parts. A correctly identified spare can be useful, but a generic belt or lid that merely looks similar is not a confirmed replacement. Save the exact part reference from the manufacturer or documented supplier before adding it to the order.
Plan for the second batch
Create a refill note as soon as you unpack the kit. Record the supplied quantities and the intended recipe, then update what remains after use. This lets you replace the item that is actually running low rather than buying another mixed bundle with supplies you already have.
Keep stage labels visible and avoid decanting different powders into indistinguishable containers. If you transfer a supply to another container, retain its identity and instructions. Good organization is part of repeatability: a record that says only “white powder” cannot help you reproduce a successful finish.
Review the checklist after the first completed project. Which accessory did you use repeatedly? Which remained untouched? Which missing item caused an interruption? Those answers give you a personalized shopping list and a better basis for comparing upgrades. A well-chosen refill order should make the next batch smoother, not simply make the shelf look more complete.
Questions at the workbench
Do all rock tumbler kits include final polish?
Do not assume so from a packet count or a general polishing claim. Read the contents and identify the actual final-stage compound and its instructions.
Do I need ceramic media for every batch?
That depends on the machine, material, size mixture, and recipe. Use the media specified for your process rather than treating one accessory as universally required.
Should I buy a large refill bundle immediately?
First check what the starter kit contains and what the intended batch consumes. A record of your actual use is a better basis for a bulk purchase than accessory count.
Sources & further reading
- RockTumbler.com: Tumbling supplies and their roles
- Thumler’s Tumbler: Manufacturer parts and supplies catalog
Machine instructions take precedence for its loading, materials, operation, and maintenance. Send a correction.